1-To install a theme using WordPress admin, follow these steps:
First, log in to your WordPress admin dashboard.
1.Next, navigate to the "Appearance" menu and select "Themes."
The template bundle that you downloaded is divided into various directories. Let's examine the contents of each folder:
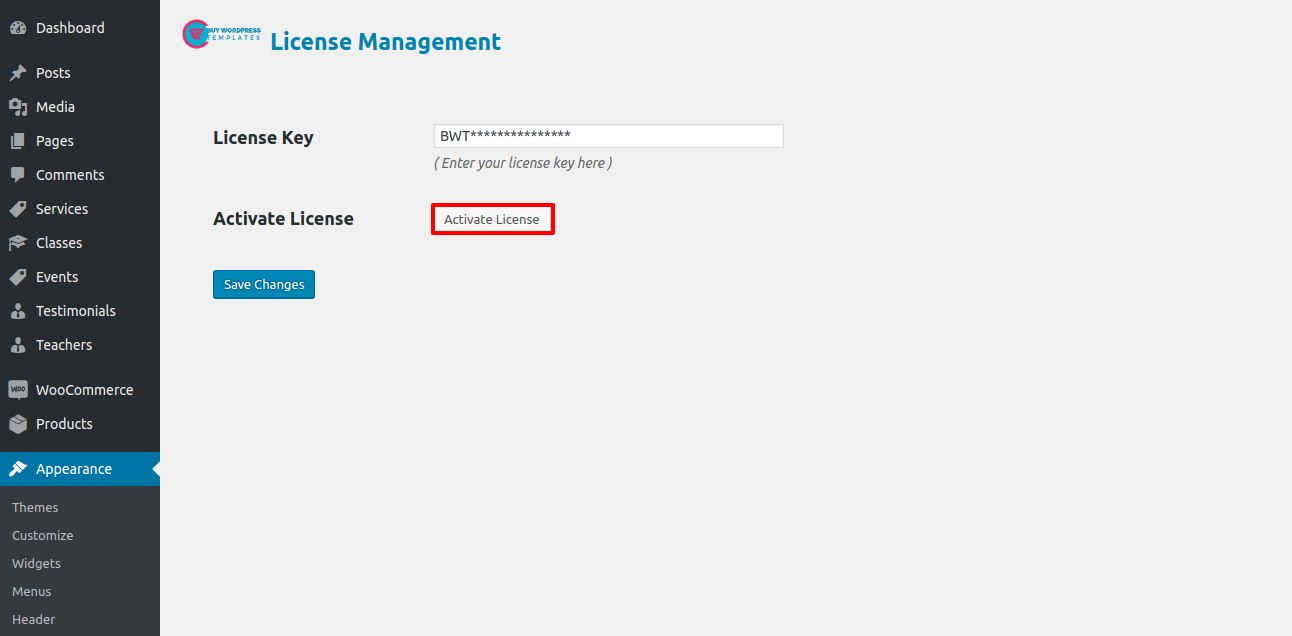
The steps for activating a BWT key are as follows.
Given that you will receive the License Key via Email, use that key to Activate License.
Use the procedure below to Activate License.
Go to Dashboard >> Appearance >>BWT Key Activation>>Enter Key>>Save Changes.

After Entering The Key >> Activate Licence.
After you Activate Licence,After the key is operational, you can begin using the theme.
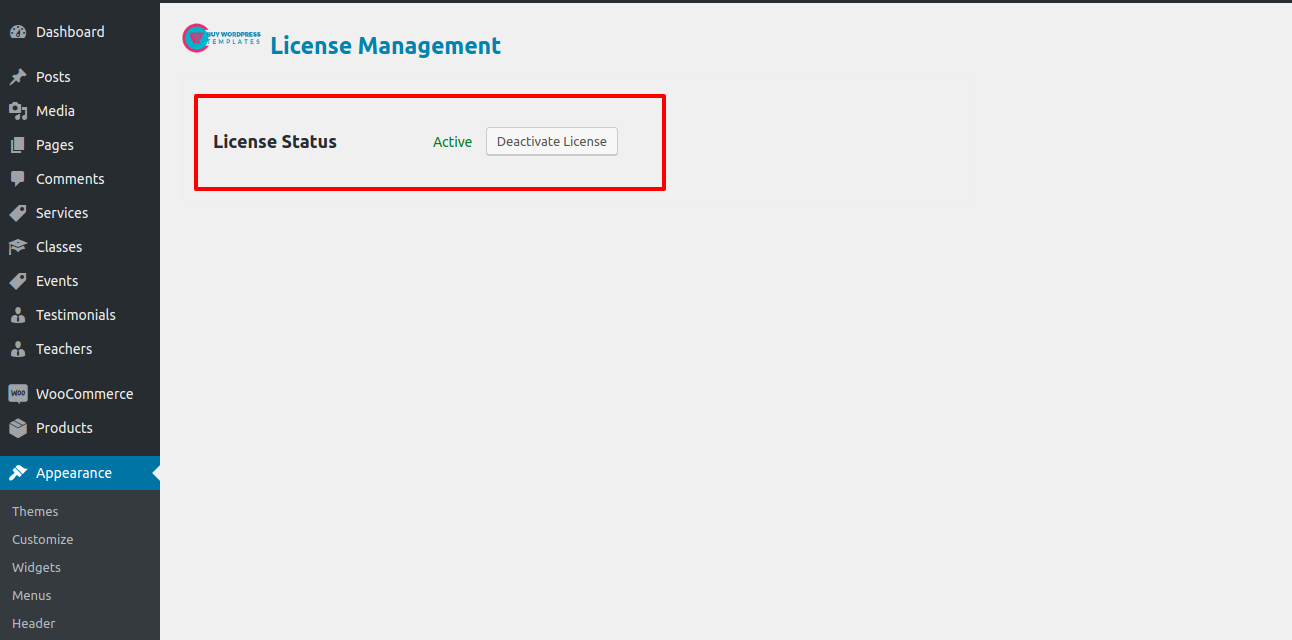
This will enable you to turn on your Licence Key.
First, log in to your WordPress admin dashboard.
1.Next, navigate to the "Appearance" menu and select "Themes."

2. Once you are on the themes page, click on the "Add New" button located at the top of the page..

3. Click on upload theme button.

4. Choose your bwt-multipurpose-blog 1.0.zip theme by clicking the Browse button, and then click the Install Now button.
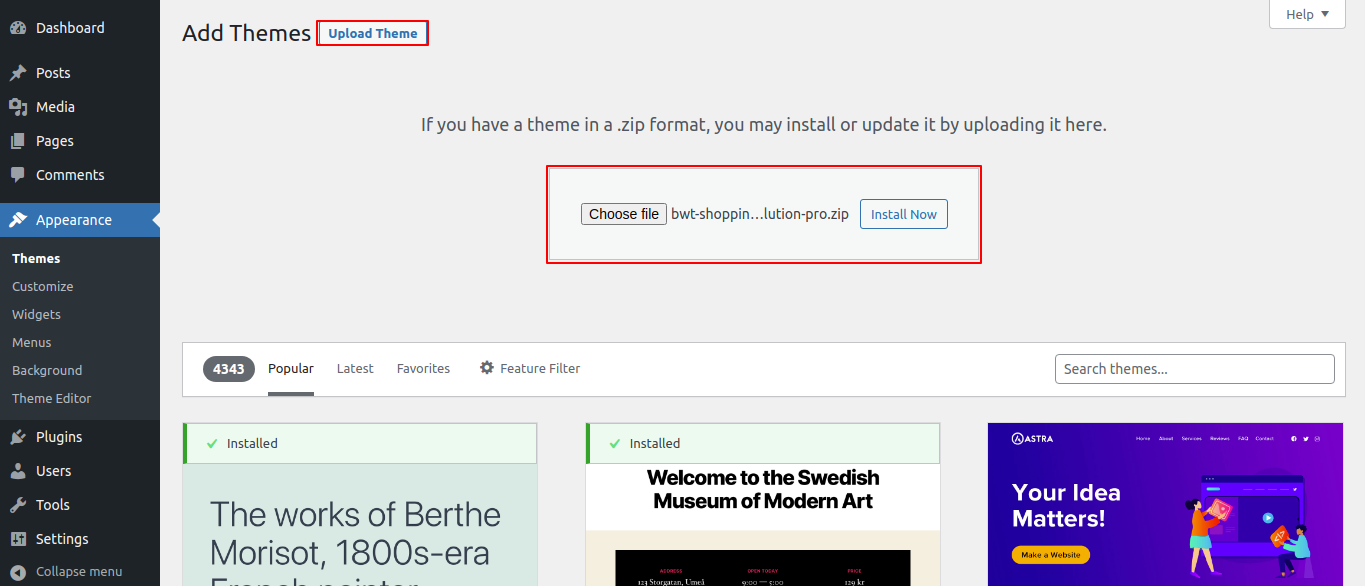
5.Your theme will now be installed by WordPress, and you will see a success message with a link to activate it or view a live preview.

Congrats! Your theme has been installed successfully.
The following instructions for uploading a plugin can be used to manually install a WordPress plugin from a.zip archive.
Install Required Plugins:
woocommerce, the bwt-coaching-pro posttype plugin, and the contact form 7 plugin
1. Go to the Dashboard plugin >> Add New >> Upload plugin.
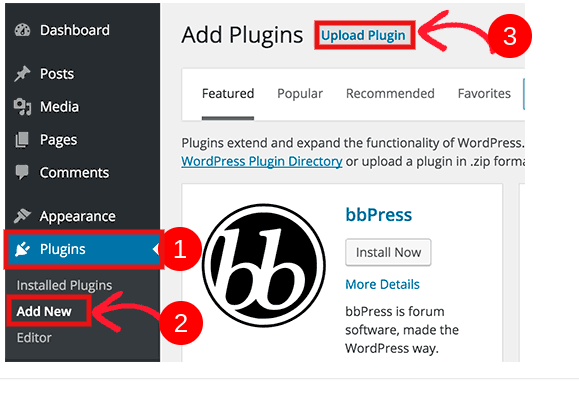
Activate after clicking the "install now" button.

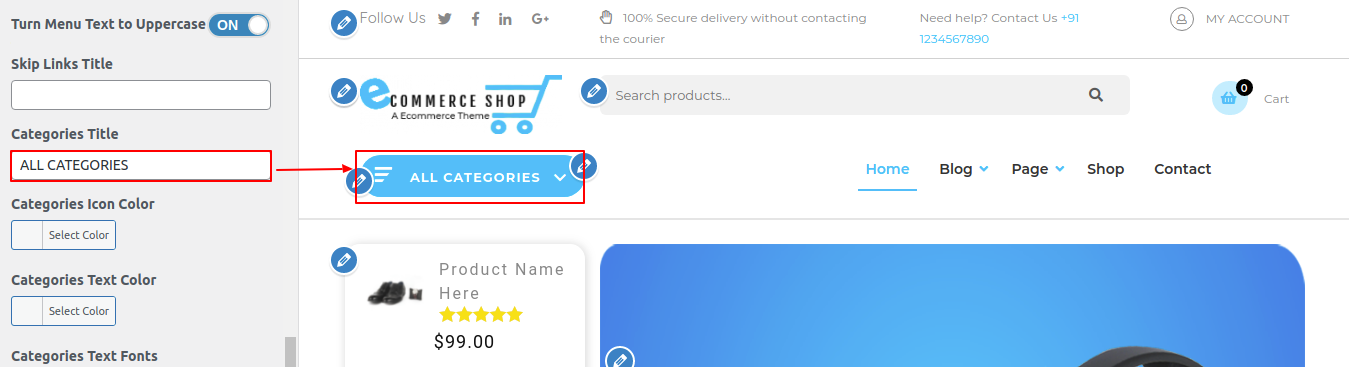
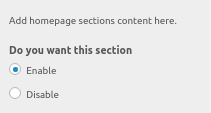
The simple method for setting or modifying the site's color and fonts is called "color/fonts setting."
Go to Appearance > Customize > Theme Settings> Color/Font Settings
The choices included in this section are as follows:
1. Headings (h1, h2, h3, h4, h5, h6) Font family
This area offers the ability to change the font family used for paragraphs and other website content.
2. Font family for the paragraph and additional content
This area offers the ability to change the font family for all of your website's headlines.
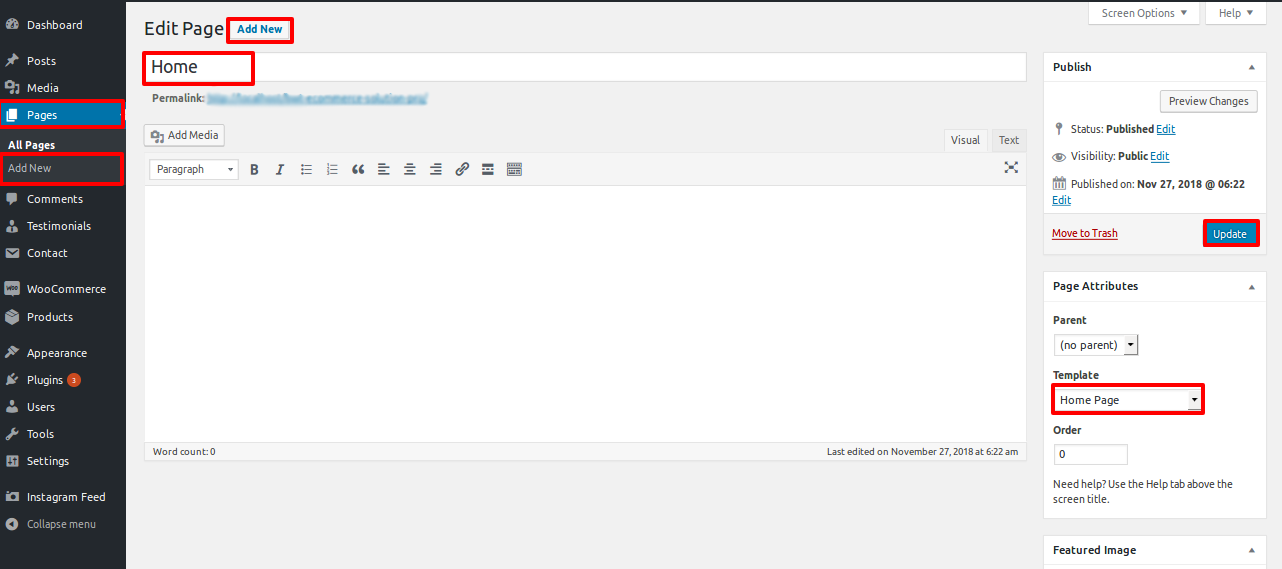
Now, click on Publish button.


To set a template, create a page: Go to Dashboard >> Pages >> Add New Page.
You can label it anything you like, such as "home." then pick the "home-page" template from the template dropdown.
Set the front page:Go to Setting -> Reading --> Set the home page as the post page display static page.
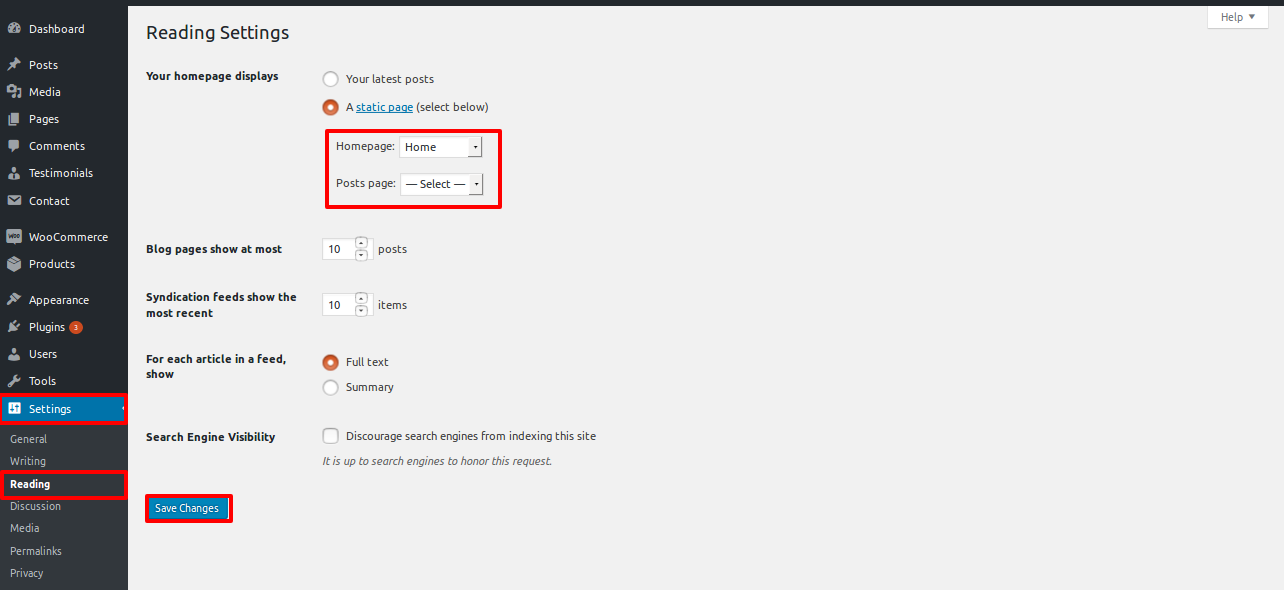
When you're finished, you can view the entire demo on the top page.
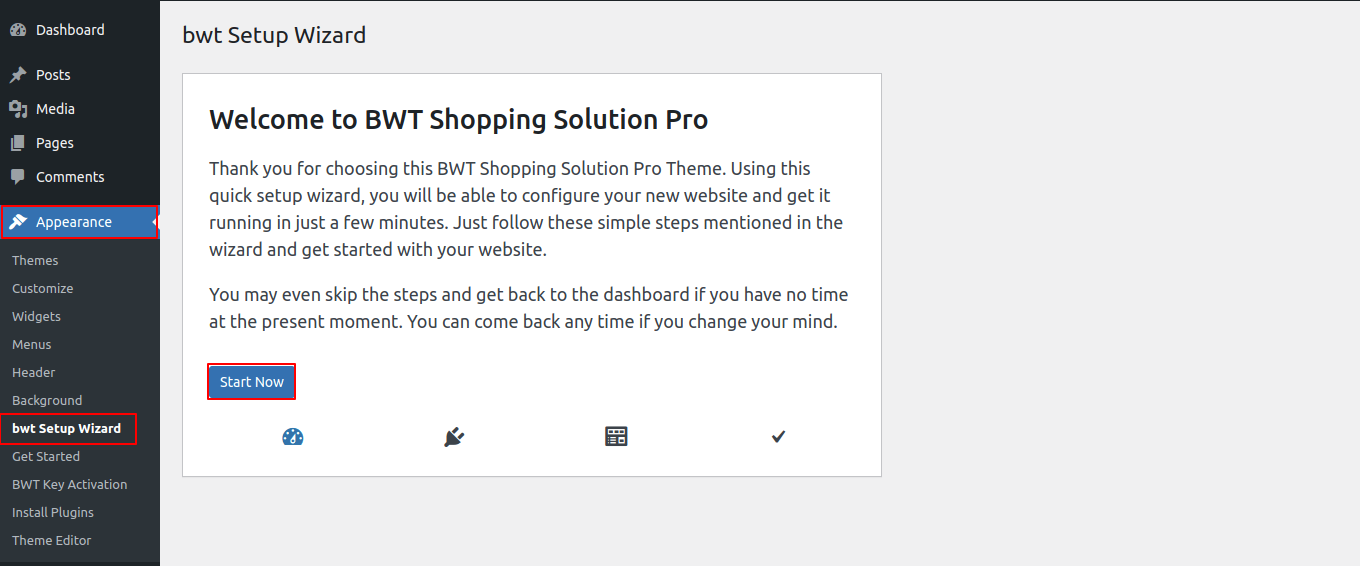
To set up your theme, simply click to import sample content. You can follow the instructions in this article to develop your website for website creation.
Go to Dashboard >> Appearance >> Get started.
You must first install the bwt-coaching-pro-posttype plugin and the woocommerce plugins before clicking "Run Importer."
Then select "Start Importe" after selecting "Demo Content Importer."
Click on "insatll plugin".

Click on "Import Demo".


To continue working with Topbar,
Go to Appearance >> Customize >> Theme Settings >>Topbar
You may add social media icons here.

Address and contact information are on the topbar section.
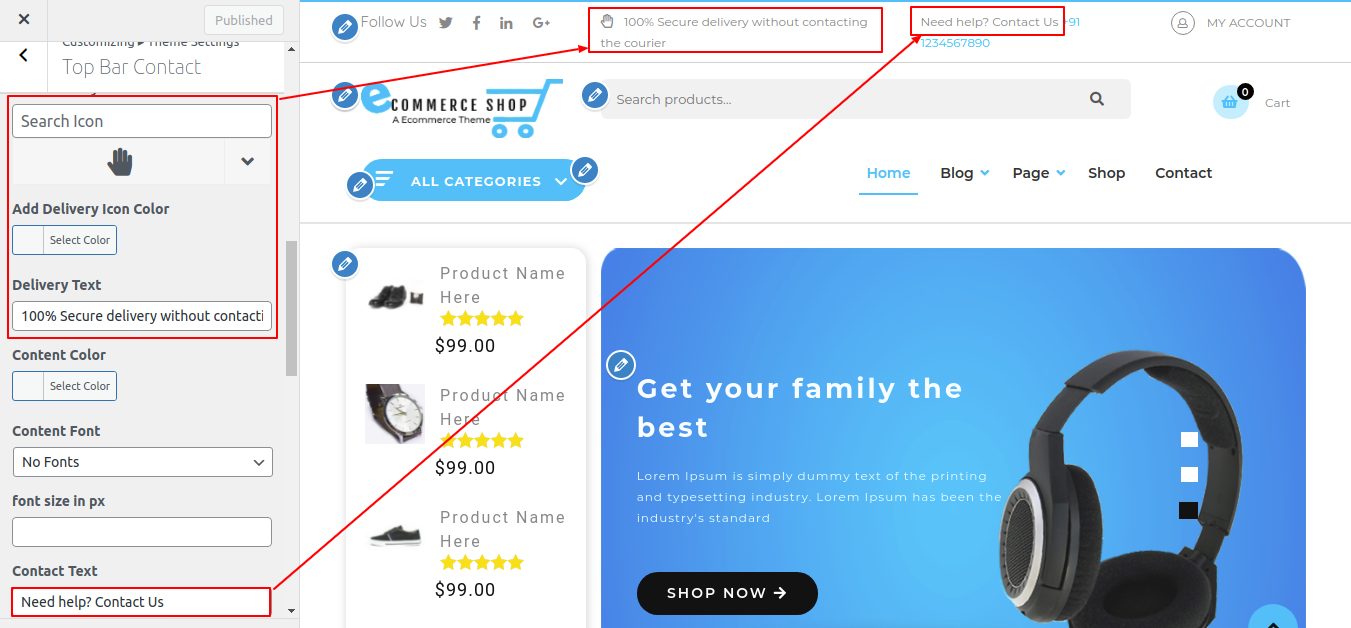

To configure Topbar, adhere to following instructions.

To set up Topbar Product Search, follow these directions.
You must first install the woocommerce plugins before proceeding with this section.
The woocommerce option will show up on the dashboard after installation.
Go to Appearance >> Customize >> Theme Settings >>Topbar Product Search

To set up Topbar Product Search, follow these directions.

Header will continue after this.
Go to Appearance >> Customize >> Theme Settings >>Header
For header setup, adhere to these guidelines.
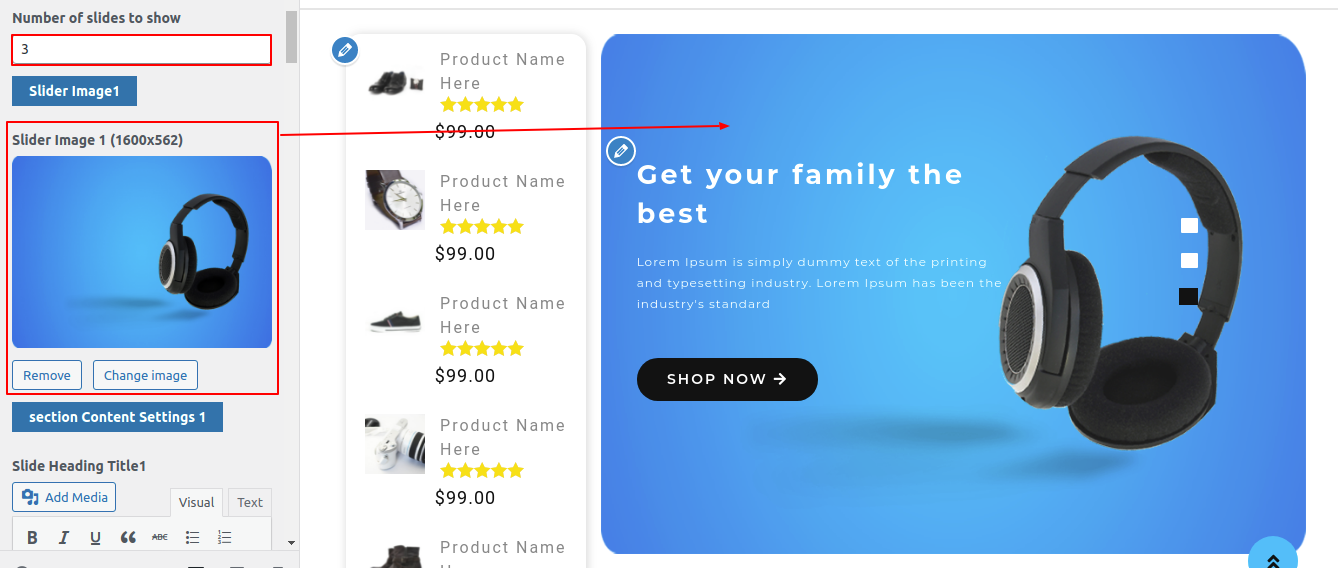
To set up the slider, adhere to the procedures below.
Go to Appearance >> Customize >> Theme Settings >>Slider Settings


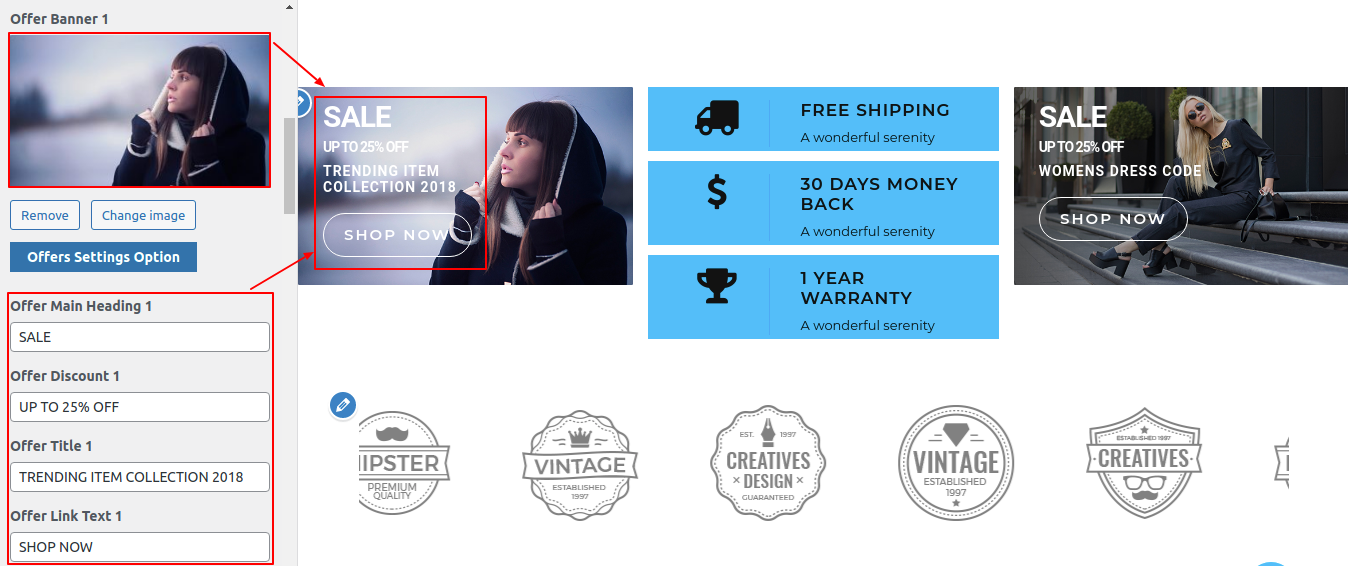
To set up the Product Offers Section, follow the instructions below.
Go to Appearance >> Customize >> Theme Settings >>Product Offers


Install the "Woocommerce" plugin first in order to set up this section.
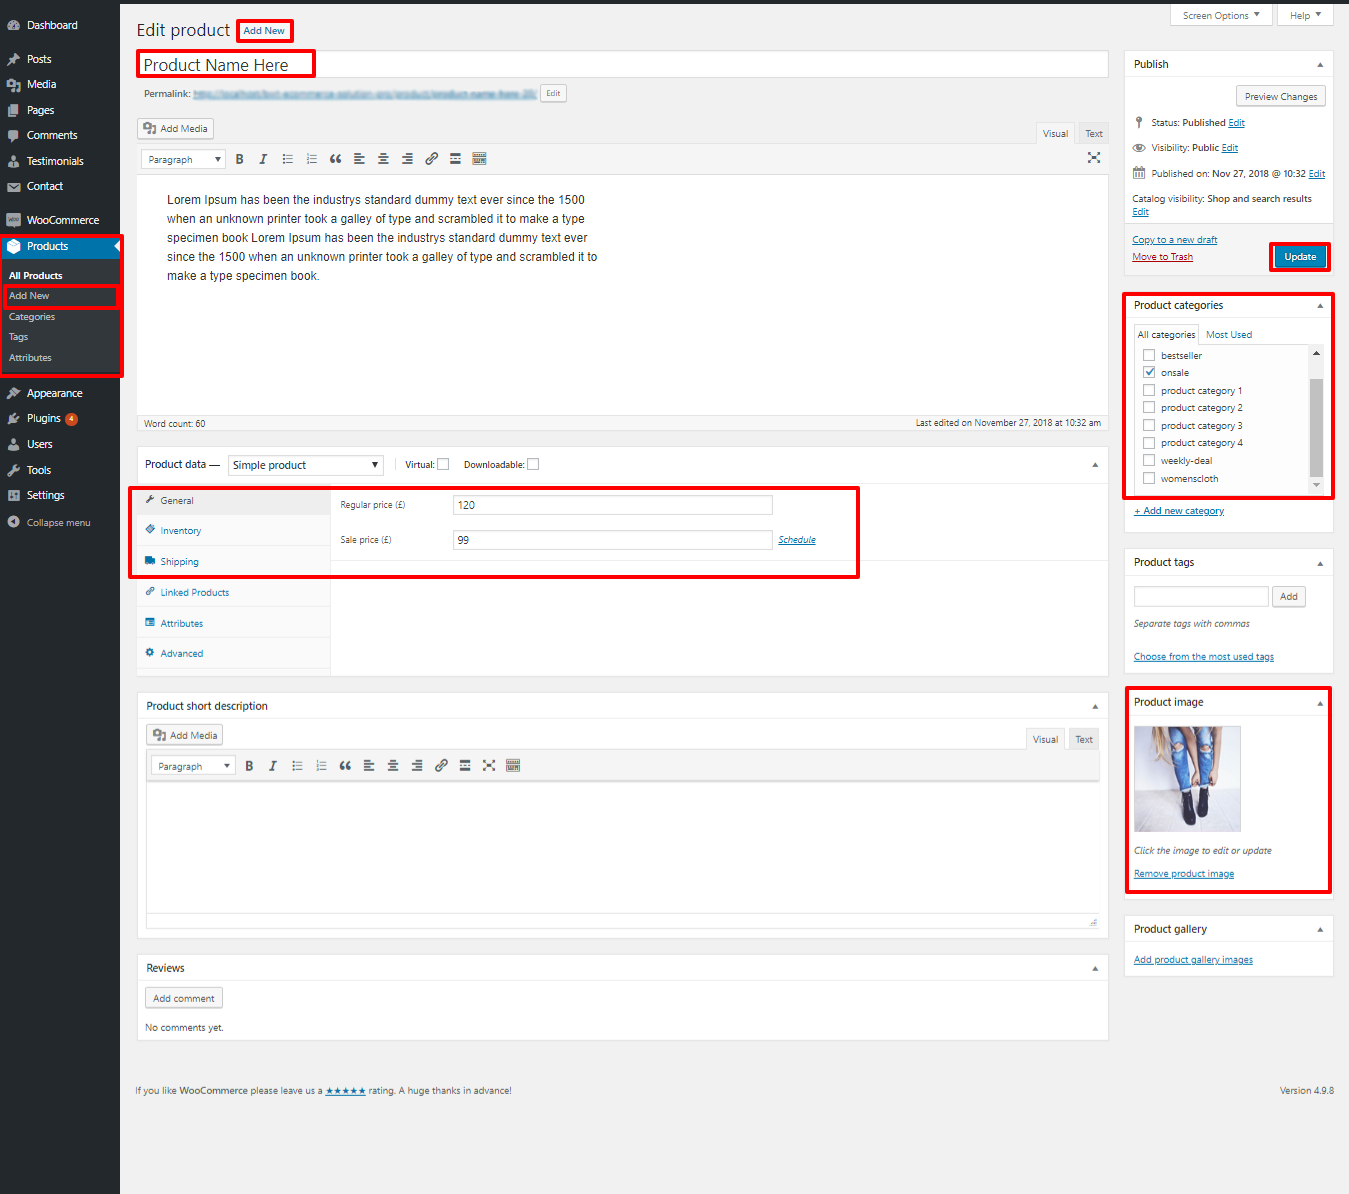
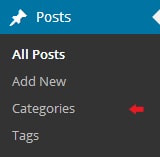
We must first add the categories before establishing the New Collection Section. to include categories.
Go to Dashboard >> Products >> Categories >> Add new category.

Go to Dashboard >> Products >> Add new Products.>>

To continue with the New Collection Section,
Go to Appearance >> Customize >> Theme Settings >> New Collection Section


Continue with Product Category if you're ready.
Go to Appearance >> Customize >> Theme Settings >>Product Category


Install the "Woocommerce" plugin first in order to set up this section.
We must add the categories before we can create the Best Selling Section. in order to add categories.
Go to Dashboard >> Products >> Categories >> Add new category.

Go to Dashboard >> post >> add new .

To continue with the "Best Seller" Section,
Go to Appearance >> Customize >> Theme Settings >> Best Seller Section


Install the "Woocommerce" plugin first in order to set up this section.
You must first create a category.

Go to Dashboard >> Products >> Categories >> Add new category.

To continue with the Weekly Deals Section,
Go to Appearance >> Customize >> Theme Settings >> Weekly Deals Section

Set up Services Section by following these procedures.


Install the "Woocommerce" plugin first in order to set up this section.
We must first add the categories before we can create products for the On Sale Tab.
Go to Dashboard >> Products >> Categories >> Add new category.

Go to Dashboard >> Products >> add new .
To access the Goods Section of the On Sale Tab,
Go to Appearance >> Customize >> Theme Settings >> On Sale Tab Products Section

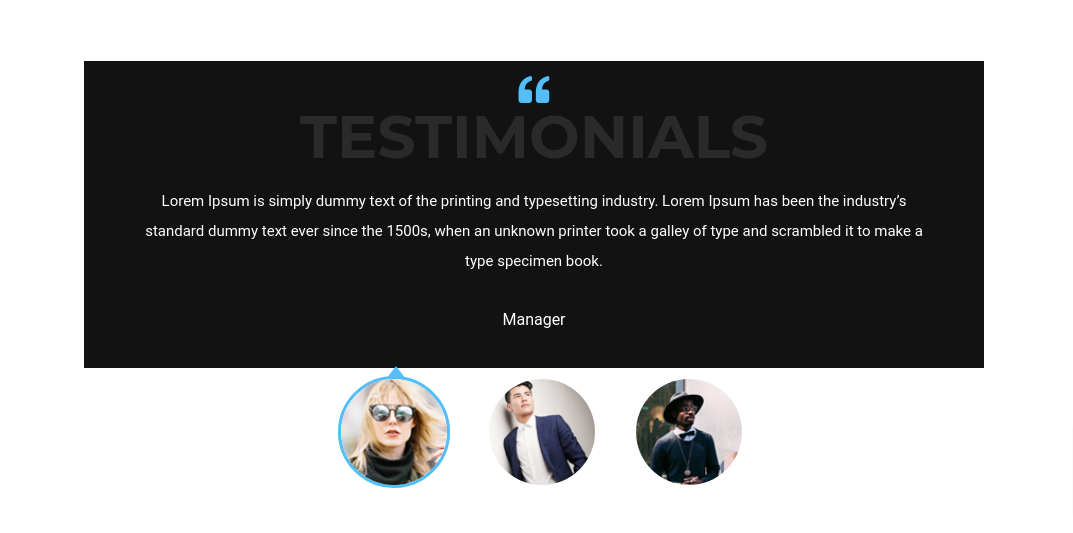
After the bwt-shopping-solution-pro-posttype plugin has been installed and activated, the testimonial area will show up in the dashboard.
To continue with the Testimonial Section,
Go to Dashboard >> Testimonial >> Add New Post
There are now a total of 3 posts in the testimonials area.

To set up testimonials, adhere to these guidelines.
Enter the post name, contents, and featured image in the Testimonials area when adding a new post. then select "Publish."

Go to Appearance >> Customize >> Theme Settings >> Special Offers.


Set up the Our Partners Section by following the steps below.
Go to Appearance >> Customize >> Theme Settings >>Our Partners


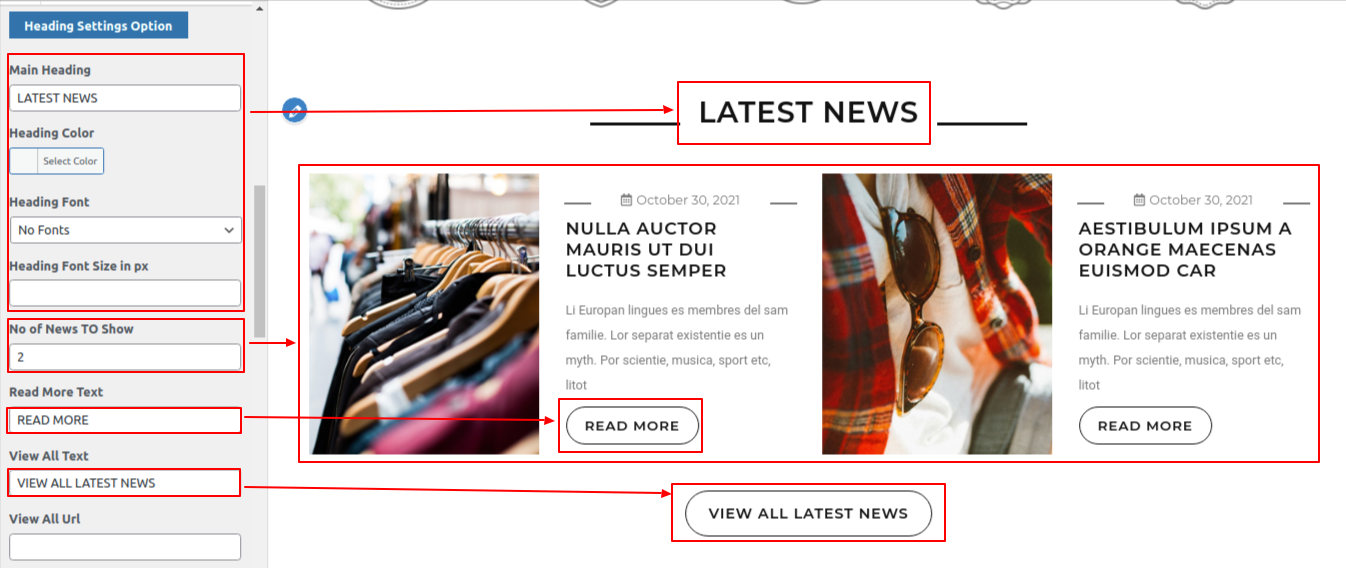
To set up the Newest News Section, go through the procedures below.
Go to Dashboard >> Post >> Add News post
Go to Appearance >> Customize >> Theme Settings >>Latest News
Go to the Single Post Page Options Area now.
Go to Appearance >> Customize >> Theme Settings >>Section for Single Post Page Settings

To configure Single Post Page Options, adhere to these directions.

Installing the Instagram feed is a prerequisite for setting up Instagram.
The Instagram feet option will show up on the dashboard after installation.
Go to the shortcode section first for a better understanding.
Go to the following link to set up the section.
Go to Dashboard >> Instagram Feed >> configure
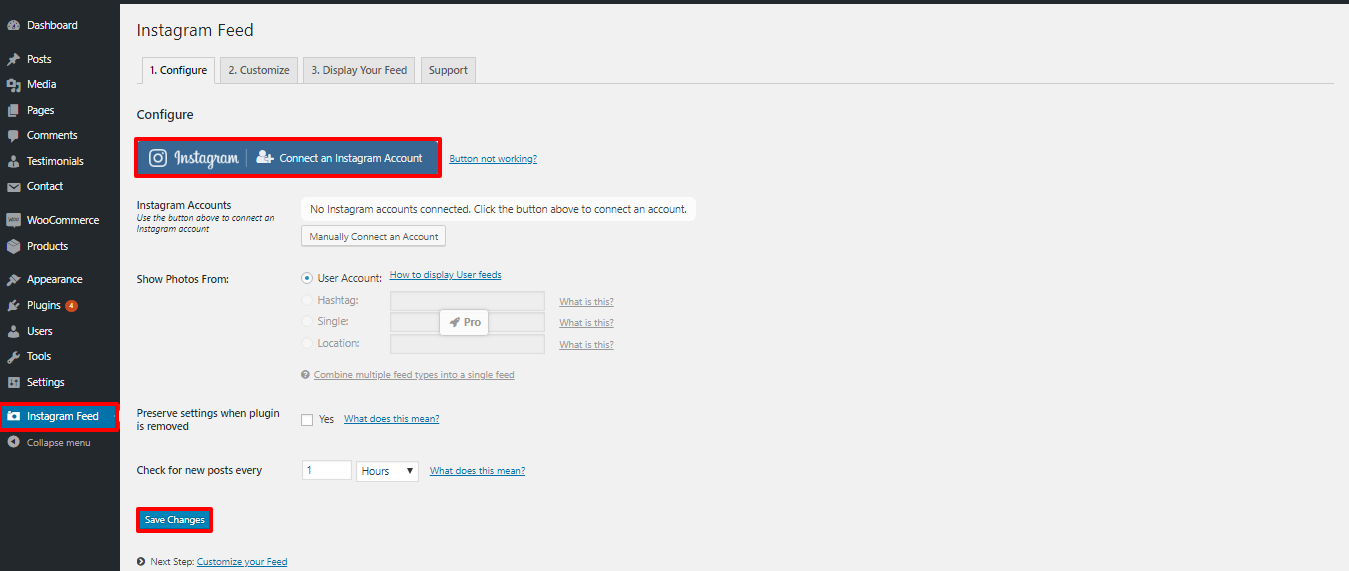
The number of columns, the number of photos, the padding around the images, and other options are all programmable.


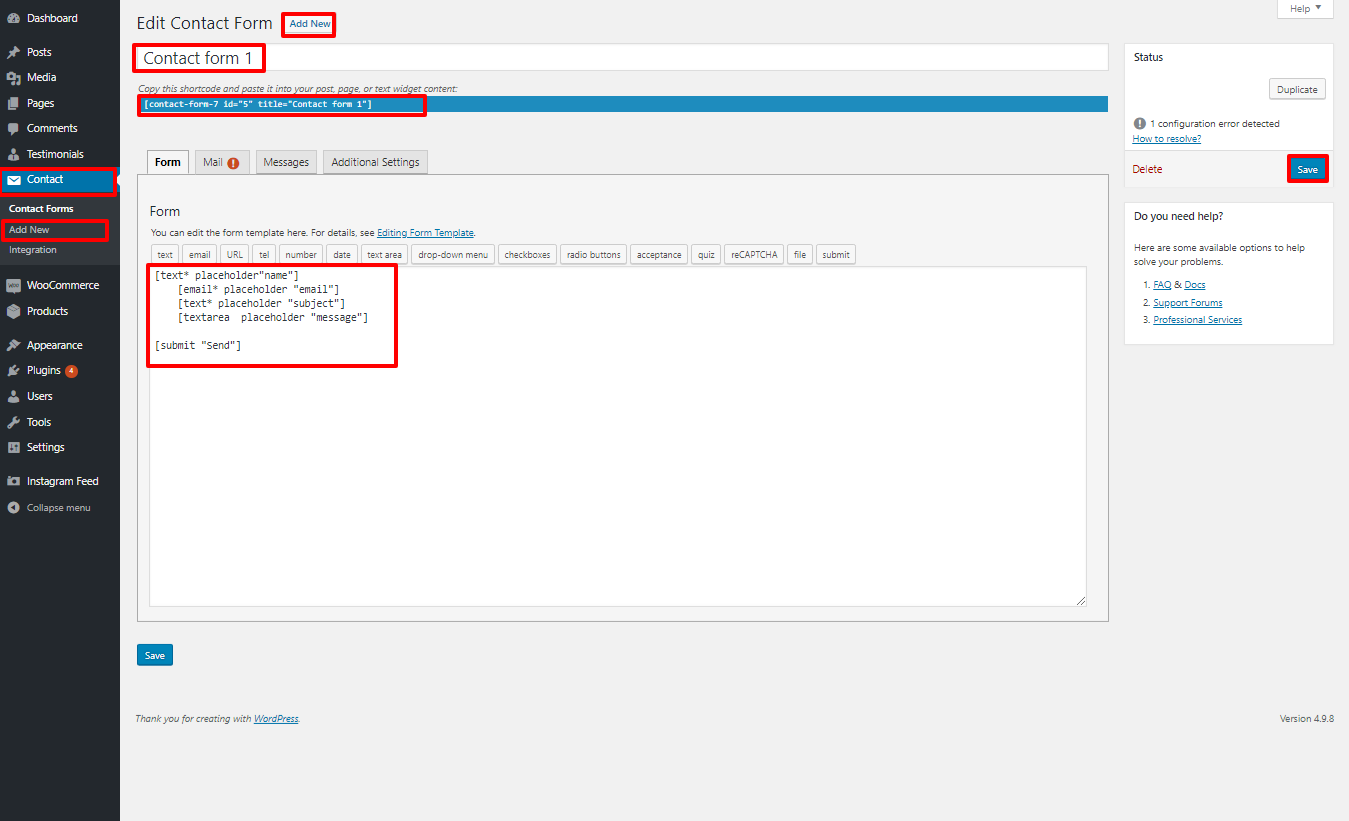
To continue with the Contact section,
the Contact Form 7 plugin must be uploaded and turned on. The contact option will be visible on the dashboard following installation.
Go to Dashboard >> Contact >> Add new
Go to Dashboard >> pages >> add new
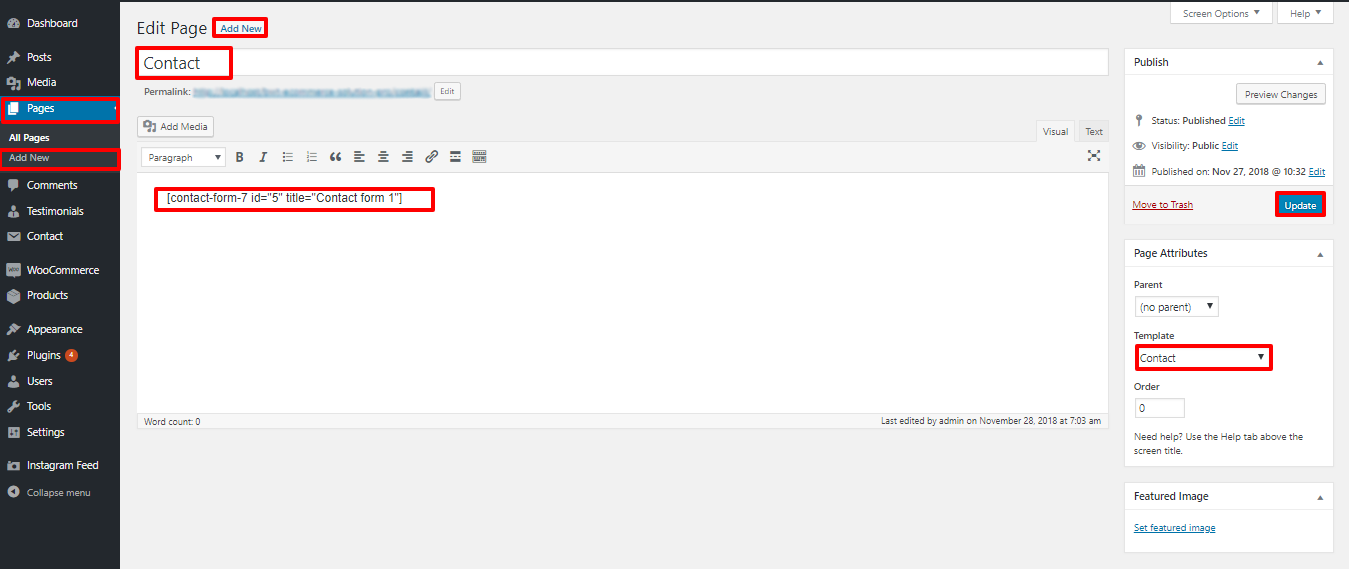
Go to Appearance >> Customize >> Theme Settings >>Contact Section
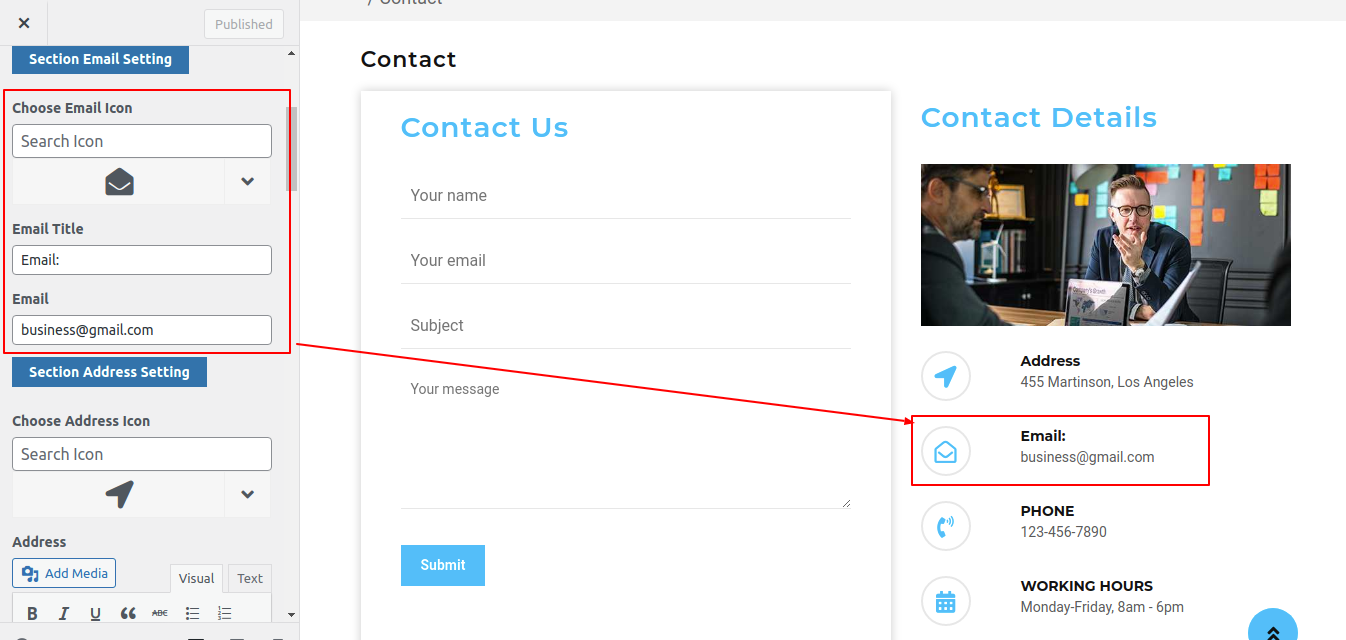


To set up the Contact section, follow these directions.

Footer will now be completed.
Go to Appearance >> Customize >> Theme Settings >>Footer Section

Go to widgets in the Appearance section and choose the four footers columns for tags, gallery, contacts, and logo picture when establishing this section.
The widgets area is explained in the image below.

To build up a footer section, follow these directions.

To continue with the Footer Text section,
Go to Appearance >> Customize >> Themes Settings>> Footer Text.


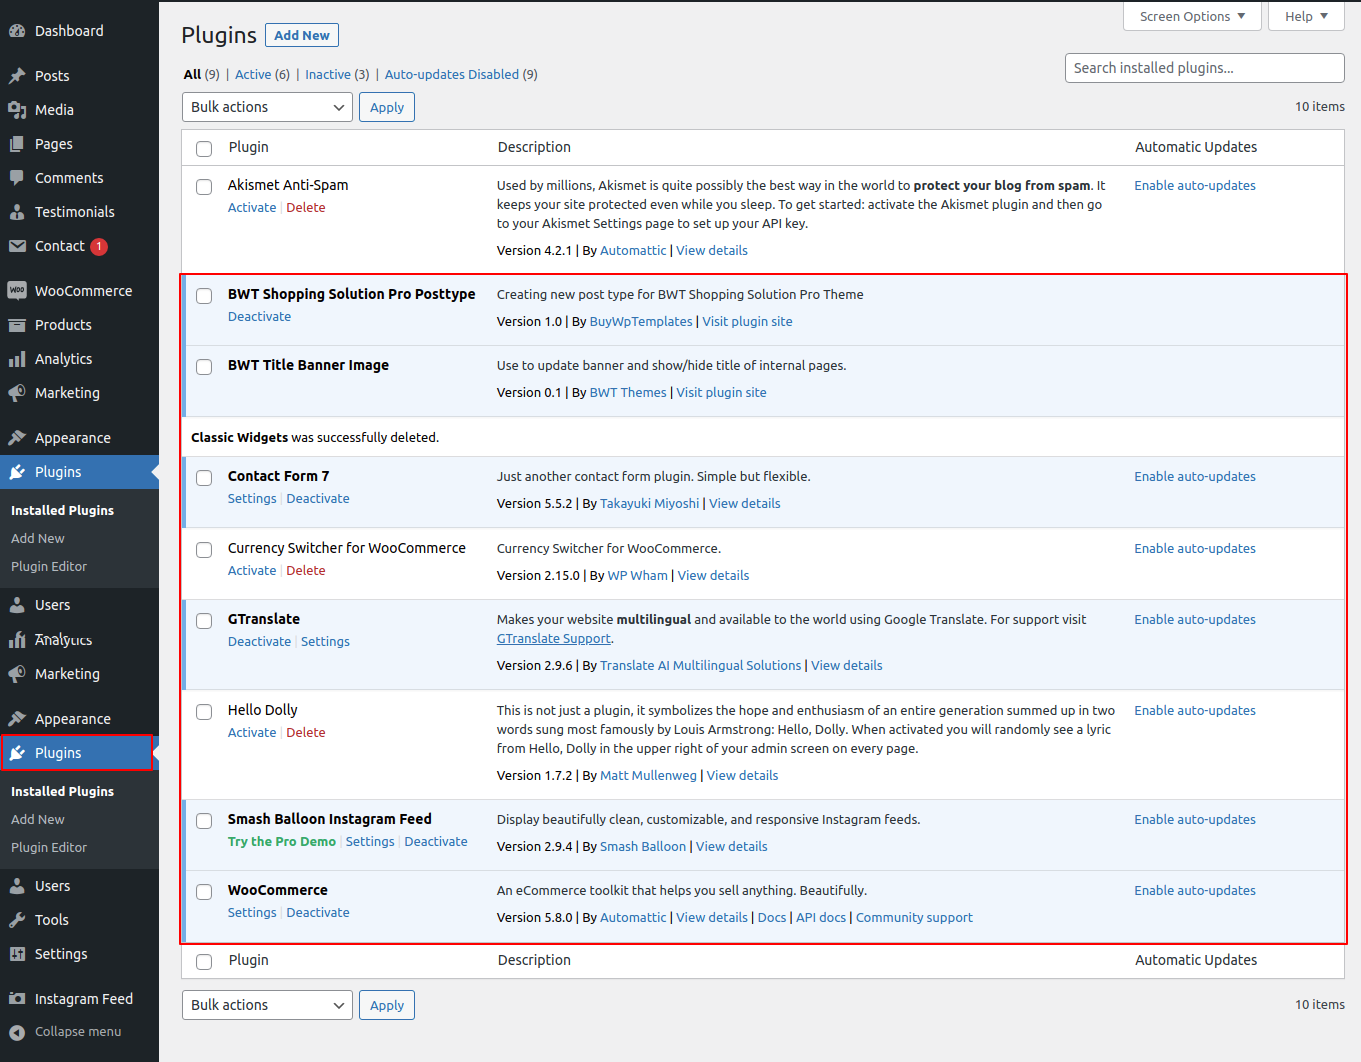
With plugins, you can increase and expand the functionality of WordPress.
If you want these features in your theme, you must activate the plugin. In order to activate the plugin in your theme, follow these instructions.
Go to Plugins >> Installed Plugins >> Plugin Name >>Activate
There are now three plugins total. Refer to the graphic below for a better understanding.
For the Testimonials area, the BWT Ecommerce Solution Pro Posttype plugin has been implemented. Refer to the accompanying figure for a better understanding.
Testimonial Section
To set up testimonials, adhere to these guidelines.
Enter the post name, contents, and featured image in the Testimonials area when adding a new post. then select "Publish."
View this image for a better explanation.

The list of new categories is shown below.


Examine the list of shortcodes included with the themes:
Fetch Every Property: [all_properties]
Get Every Property By Category: [properties_by_cat cat_name="Add category slug"]
Fetch Every Agent:[agents]
Fetch All the Testimonials: [testimonials]


